As a developer, you will likely configure Tags and Triggers in GTM at some moment. If you are seeking for simple instructions on how to initiate a click trigger in your GTM for a React-based project, you have come to the correct spot. Let's study it step by step!
This article walks you through the steps required to configure a click trigger in a React-based application. Once you have mastered the primary GTM-related concepts, you are only a few configuration steps away from utilizing the desired tag management capabilities. So what is Google Tag Manager, and how do the Tags and Triggers functionalities benefit you?
Google Tag Manager – What is GTM and how to use it?
Google Tag Manager (GTM) is a tag management system that, following basic code configuration, provides simple integration of tags on any website or mobile app. The primary advantage of utilizing the GTM is the ability to modify tag settings directly from the web panel interface. Having stated that, there are three fundamental ideas to comprehend while dealing with the GTM:
- Tags are code fragments or tracking pixels (such as the Facebook pixel) that collect and transmit the analytics data collected from your website or mobile application.
- Triggers monitor events and determine when to execute tags.
- Variables relate to the additional data that tags or triggers may require (e.g., execute this tag when the URL is /some/url).
What advantages does utilizing Google Tag Manager offer?
Because Google Tag Manager is an intuitive and comprehensive website and digital marketing tool, it offers several advantages to your business and team. Below are the four primary advantages of utilizing Google Tag Manager.
1. GTM DOESN'T REQUIRE CODING KNOWLEDGE
Google Tag Manager enables anybody, including marketers, to implement tags without substantial technical skills. The user-friendly interface enables users to change, delete, or add GTM tracking code without the aid of web developers, however a background in the field is recommended. This enables small firms with inadequate technical assistance to maximize internet tracking.
2. GTM ENABLES FLEXIBILITY AND EXPERIMENTATION
Since GTM does not require a web developer, it enables marketers to experiment with and test various techniques and concepts. It enables the implementation of trials and the enhancement of marketing plans in accordance with emerging digital marketing trends without the need for external support.
3. GTM SUPPORTS FASTER PAGE LOADING SPEEDS
Google Tag Manager is configured to execute tags asynchronously as opposed to synchronously. This implies that each tag is deployed immediately after loading, rather than waiting for all tags to load before firing. This avoids the possibility that a tag with a sluggish loading speed may impede the deployment of the others.
4. GTM MANAGES EVERYTHING ALL IN ONE SPOT
GTM simplifies and enhances the whole process of employing tags since all GTM tracking code is maintained in a single location, rather than being developed and managed on separate platforms. Having the ability to generate and view all deployed tags from a single interface avoids duplication and potential mistakes, resulting in a significant increase in productivity.
What is the purpose of Google Tag Manager?
GTM has the capacity to track an infinite number of website and digital marketing activities, but most organizations only employ a handful of them.
- Downloads
- Scrolls
- Clicks
- Forms
- Videos
1. MONITOR PDF DOWNLOADS
As part of their digital marketing strategy, a number of companies offer downloadable PDFs on their websites, such as guidelines and white papers. If you do not have access to statistics concerning downloads, however, an effective plan is significantly hindered.
Google Tag Manager is utilized to monitor PDF downloads and assess their performance. Once you can track downloads, you transform the gathered data into useful insights.
- Determine your top and bottom downloads.
- Determine why a download is successful or unsuccessful
- Consider strategies to enhance your download, and use GTM to monitor your progress.
2. TRACK SCROLLING BEHAVIOR
GTM's ability to detect scrolling activity on your website and pages is another incentive to utilize it.
Understanding how people browse and engage with your website's content gives valuable information into site activity.
- What page areas are often visited?
- What information is more or less engaging?
- Where most visitors stop scrolling
With the collected GTM data, you can construct a comprehensive picture of how the majority of site users browse through each page. In exchange, you may develop a strategy to enhance the user experience on your website.
- How you structure your site
- What material do you share?
- locations in need of improvement
3. LINK CLICKS STATISTICS & RECORD
Google Tag Manager's ability to track link clicks, precisely the URLs that visitors clicked on your website, is a benefit. Knowing not just a user's scrolling behavior, but also their clicking activity, gives significant insight into their trip around your website.
- How does your site's visitor go from one page to another?
- Which call-to-actions (CTAs) get the most clicks?
You should utilize Google Tag Manager not only to comprehend link clicks, but also to act on this data.
- Refresh sites with few clicks or examine pages with several clicks in order to maximize conversions.
- Learn what factors contribute to a CTA's high click-through rate and revise the copy for CTAs with a lower click-through rate.
4. FORM SUBMISSION TRACKING
Signing up for a newsletter, completing a questionnaire, or registering for an event are all examples of forms that have a specific purpose and function on a website. GTM guarantees accurate form submission tracking.
Why using Google Tag Manager for form tracking:
- Report website leads generated through form submissions.
- Calculate the ROI of a campaign based on the number of submitted forms.
5. MONITOR VIDEO ACTIVITIES
Videos are an increasingly popular digital marketing tactic that is on the rise. With the proliferation of video material, it is necessary to comprehend how people engage with the information.
- How individuals saw the video
- How long do they see the clip?
- If or when they finished viewing the video
The data acquired from your videos can inform the video strategy of your organization.
- How future videos will be created
- What content does your audience prefer
- Ideal video length for your company's clients
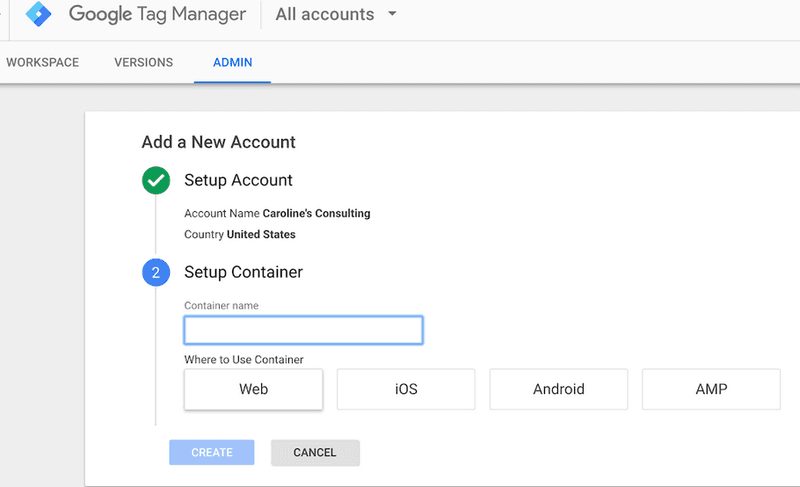
Creating a GTM account
Setting up a free account is a straightforward two-step procedure, but it is distinct from your existing Google Analytics and Gmail accounts. To facilitate a smooth account setup for you, we have documented our account creation procedure. The interface should have the following appearance:

Here's how to proceed:
Step #1 Register for an account.
Click the green "Sign Up for Free" button on the Google Tag Manager page. It will request your account name (business), country, and website's URL, as well as the locations where you wish to utilize Google Tag Manager (web, iOS, android, AMP). Click the blue "Create" button when you are completed.
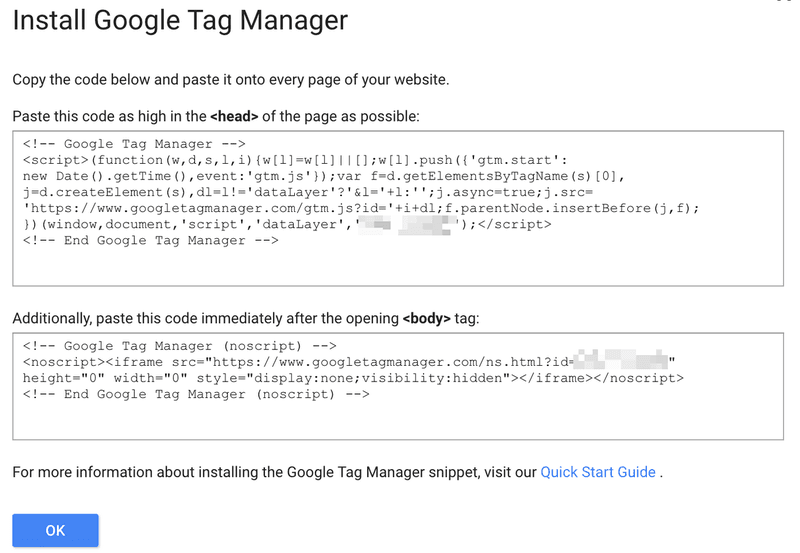
Step #2 Insert js codes to your site
You will then be provided with codes and instructions to place one code high in the head> of your page and the other code after the opening body> tag. You may do this action now or apply the codes to your website later (they are accessible in your dashboard). Once you're done, click "Ok".
Step #3 Create a Tag
Once you have a Google Tag Manager account, you will want to understand how to put up a tag immediately.
Google Tag Manager allows for an infinite number of tag setups.
This is useful for developing in-depth reports on the behavior of your audience, but it can become inefficient if your tags are not well organized.
Google suggests the following naming standard for tags: tag type – app name – detail.
Perhaps you identify one tagging setting as "AdWords conversions – iOS – February 2018 campaign" and another as "Google Analytics – CTA – About Us page."
Thus, you can accurately identify and gather data pertaining to certain campaigns or sites.
For example, the second tag, "Google Analytics – CTA – About Us page," indicates the performance of your About Us call-to-action button. This information is important and might be lost if you call your tags something more generic, such as "CTA button."
Now that we've clarified it, let's see how to create a tag:
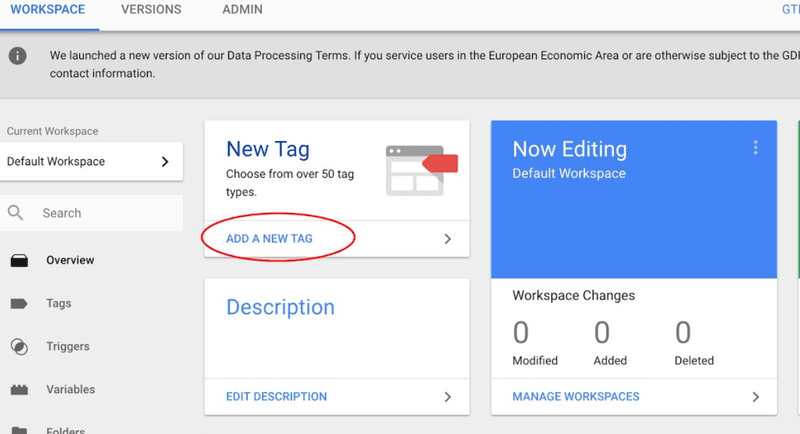
Step #3.1 Create a new tag on the dashboard of Google Tag Manager.
In your Google Tag Manager dashboard, click "Add a New Tag" (circled in red below).
Step #3.2 Configure your tag.
Click anywhere in the "Tag Configuration" box at the top of the page to select a tag type.
You can add your code directly in below. or you can start with a template in the next step.
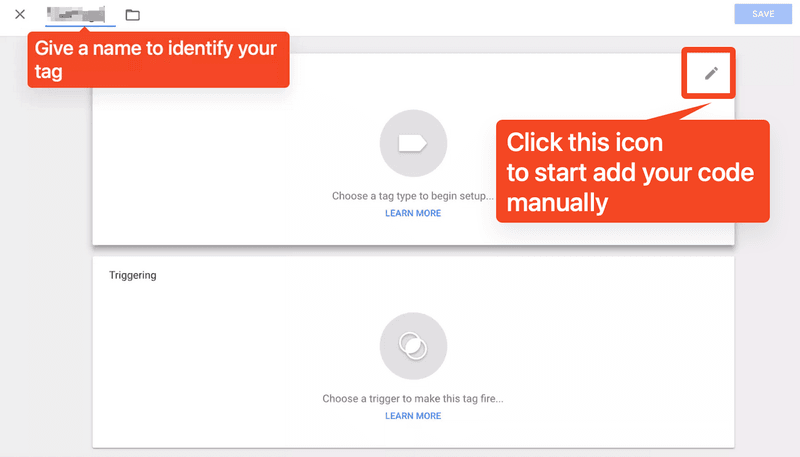
Step #3.3 Select a tag type.
There are several tag kinds (they are not all displayed here, and you can also customize a tag type). Please select "Google Analytics 4" if you would like to set up Google Analytics webpage visitor monitoring for your app and website.

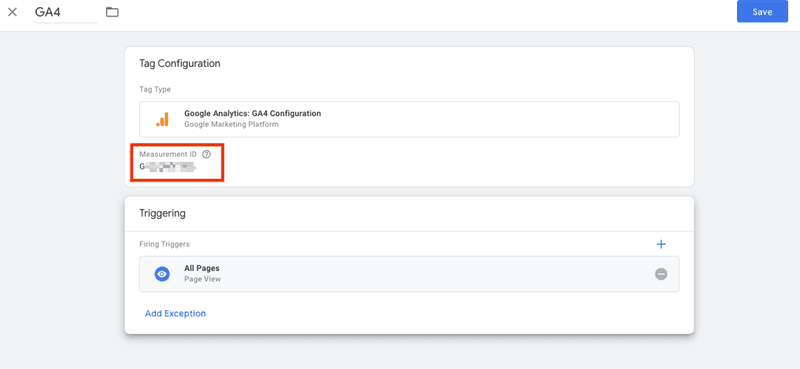
Step #3.4 Link to GA4 of your website
There will be a box for you to input your Measurement ID. Copy your Measurement ID from your account and paste it into this field.
*Before that, you must complete the configuration of GA4 of your website.
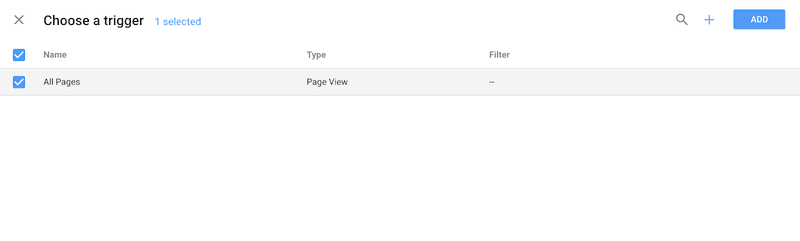
Step #3.5 Determine when a tag is recorded by selecting a trigger.
Choose a trigger (a trigger is when you want the tag to be recorded, such as "every time a user views the page"). I selected "All Pages" to receive data whenever any of my web pages are seen, but your selection may vary based on your objectives.
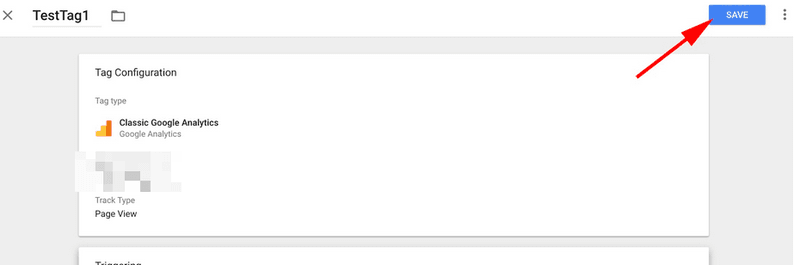
Step #3.6 Save your tag.
Click the blue "Save" button after you are satisfied with the information in the "Tag Configuration" and "Triggering" boxes.
Step #4 Activate your tag by hitting the "Submit" button.
Click the blue "Submit" button afterward. Your tag will not function unless you do so.
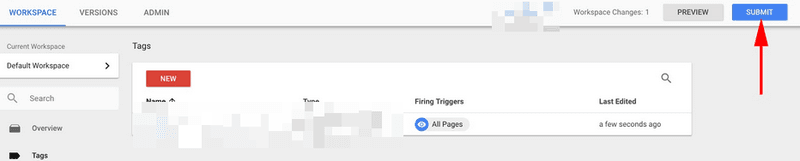
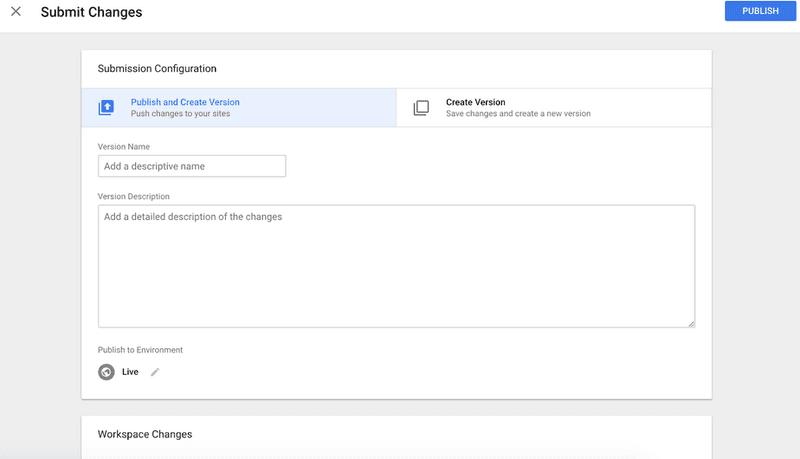
When you click "Submit," this "Submission Configuration" page will load. "Publish and Create Version" and "Create Version" are the available options. I chose "Publish and Create Version" and then clicked the blue "Publish" button in the upper right corner of the screen, as I was ready to push the tag into all of my site's pages.
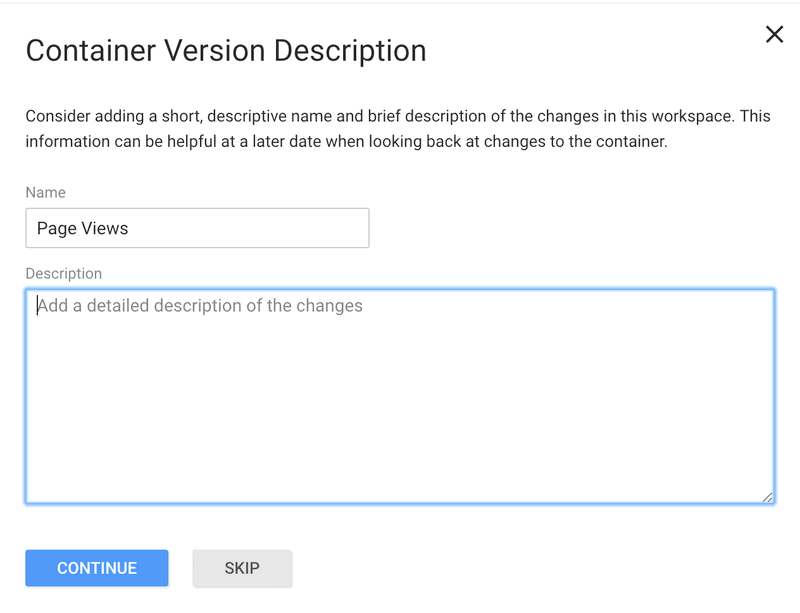
Step #5 Add a name and a description to your tags to arrange them. [OPTIONAL]
Finally, this "Container Version Description" will be shown. To keep your tags structured, give each tag a name and description that explains what you're attempting to capture with it.
Google Tag Manager for WordPress
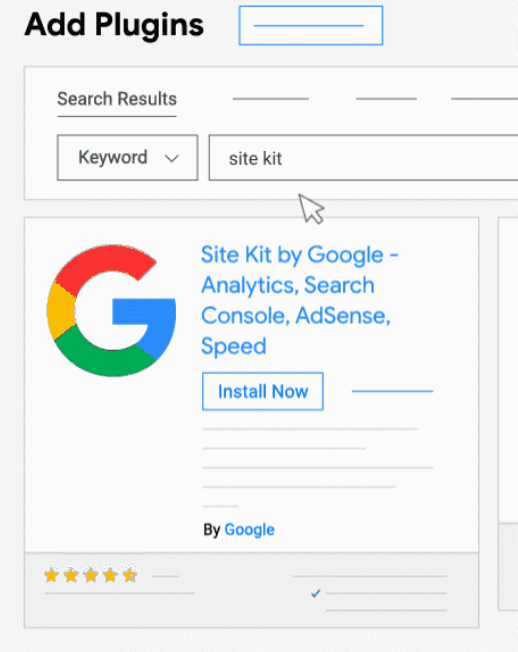
If your organization utilizes WordPress to host its website, integrating Google Tag Manager into WordPress is a simple no-code procedure.
Site Kit is the official WordPress plugin created by Google. Site Kit simplifies the installation and configuration of essential Google tools, such as Google Tag Manager, and provides authoritative, up-to-date guidance on how to thrive on the web. Review the list of Google products that Site Kit supports.
Here's how to proceed:
1. Sign into your WordPress account.
2. Ensure that your site is publicly available, meaning that it is not in maintenance mode or password-protected.
3. In the menu on the left, click Plugins.
4. At the top of the Plugins page, click Add new, then search for "Site Kit."
5. Click Install Now on the Google Site Kit page.
6. Once the plugin has been installed, select Plugins from the menu on the left.
7. Click Activate beneath "Site Kit by Google"
8. Once the plugin has been activated, click Site Kit on the left.
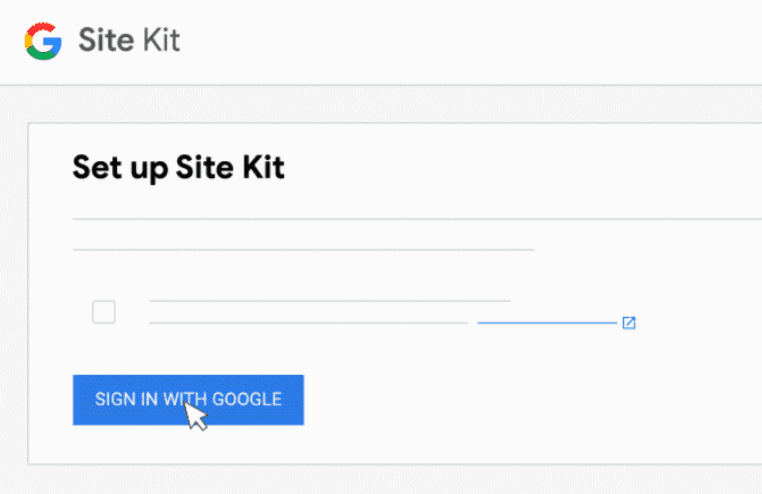
9. Sign in with your Google account by clicking Sign in with Google.
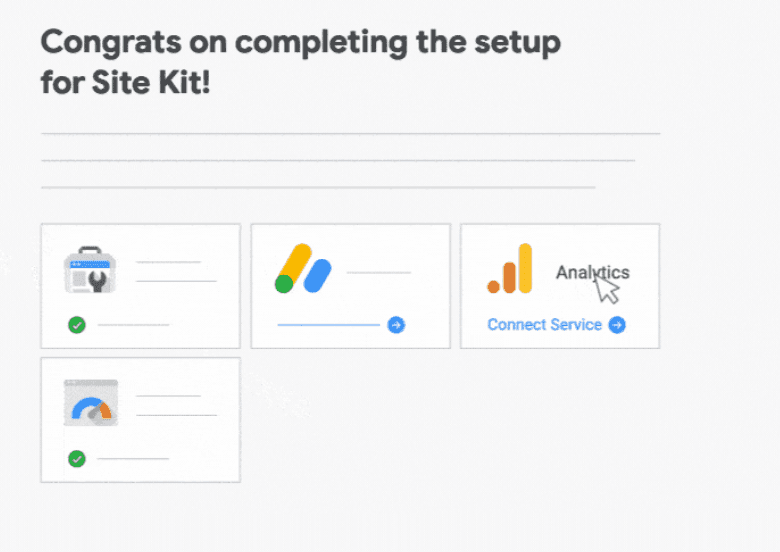
10. Go through the wizard and enable Google Tag Manager and Google Analytic 4.
11. Click Proceed to confirm ownership of the site after providing permission.
12. Allow access to Google account information by selecting Allow.
13. To add the site to Search Console, click the Add site button.
14. You've successfully setup the plugin.
15. Click Proceed to my Dashboard to proceed.
16. Select Site Kit and Dashboard from the menu on the left.
17. Click Connect Service under the Analytics heading.
18. Continue to provide more permissions by clicking Continue. How to provide Site Kit expanded access to your Google account and continue integrating WordPress to Google Analytics.
19. Select the analytics property that already exists, then click Configure Analytics.
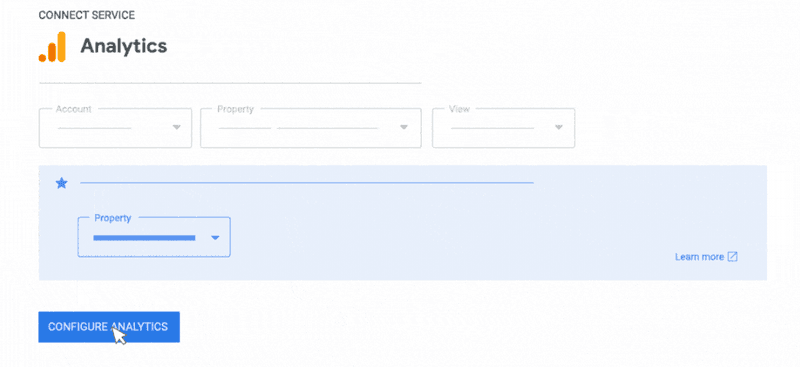
Now, analytics are configured.
Wrapping Up
Google Analytics 4 and Google tag Manager lets you make more informed marketing decisions and provides huge enhancements to the tracking of client activity.
Implement this more recent version using GTM and use the flexibility that GA4 offers.
Want Assistance Installing GA4 and GTM? Or Migrating Google Tag from GA3 to GA4? We are here to help, please feel free to Make Contact with us!